
This is a step-by-step guide to create a HubSpot RSVP In the main HubSpot Dashboard, Hover over the...
A guide to uploading lists in HubSpot
Before You Begin
Please ensure your file is saved in one of the following formats before uploading:
- CSV (.csv)
- Excel Workbook (.xlsx)
Step 1: Navigate to Imports
- Go to the CRM tab.
- Click Segments.
- In the top-right corner, select Import.
- Click Import Data.
Step 2: Choose Your Import Type
Quick Import
Use Quick Import when updating or correcting information from a previous import and no additional property mapping is required.
Advanced Import
Use Advanced Import when your file contains CIFs or other properties that require mapping.
In most cases, Advanced Import is the recommended option, as it provides greater control over how your data is imported.
Note: If your file contains Account properties such as CIF, Banking Jurisdiction, Business Unit, or similar fields, the data must be mapped and uploaded using an Advanced Import.
Step 3: Select the Appropriate Objects
Ensure you select all objects represented in your file.
For example, if your file contains:
- CIF
- Banking Jurisdiction
- Business Unit
These are Account properties and must be mapped under the Account object during the import process.
Refer to this link to determine which object each property belongs to before proceeding.
Step 4: Choose How Contacts Should Be Imported
Create and Update Contacts
This is the most commonly used option.
HubSpot will:
- Create new contacts that do not already exist.
- Update existing contacts based on their email address or HubSpot Record ID.
Create New Contacts Only
HubSpot will create new contacts from your import file.
If a contact with the same email address already exists, that record will be skipped.
Update Existing Contacts Only
HubSpot will update existing records using a unique identifier such as:
- Email Address
- HubSpot Record ID
- Account - CIFs
Any new contacts included in the file will be ignored.
Step 5: Upload Your File
Upload your file by:
- Clicking Choose File, or
- Dragging and dropping the file into the upload window.
Step 6: Map Your Properties
Once your file has been uploaded, HubSpot will prompt you to map each column to the corresponding HubSpot property. It is recommended to get the green check in all the properties you import.
Reviewing Mapping Errors
HubSpot may flag errors when imported values do not match the requirements of a property.
For example, the (No value) data in the Business Unit column do not match the available options in HubSpot, the system flagged it as an error.
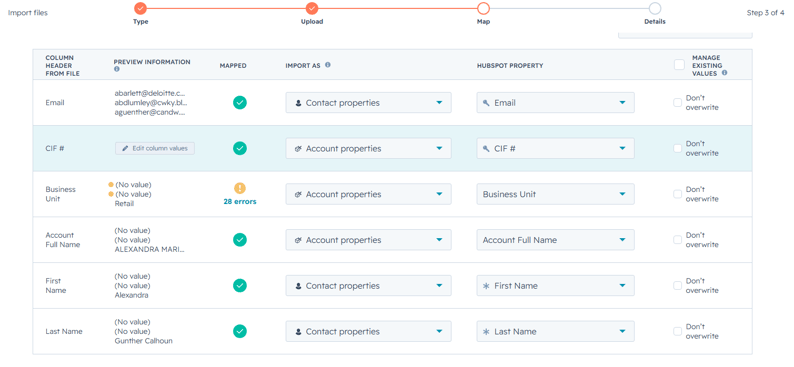
To proceed:
- Select Don't Overwrite to prevent invalid values from being imported.
- Valid data will still be imported successfully.
- Any invalid values will remain blank.
Alternatively, you can correct the data in your source file and upload the file again.
Step 7: Complete the Import Details
Before finalizing your import:
Name Your Import
- Use a clear and descriptive name.
- Remove file extensions such as:
- .xlsx
- .xls
- .csv
Create a Contact Segment (Optional)
If the imported list will be used for email communications, select:
Create a Contact Segment from this Import
Select a Legal Basis
Choose the appropriate legal basis for processing contact data.
In most cases, customers can be categorized under:
Legitimate Interest - Customer
Set Marketing Contact Status
Select: Set these contacts as Marketing Contacts
Step 8: Finish the Import
Once all required fields have been completed, the Finish Import button will become active (orange).
Click Finish Import to complete the process.
Your list has now been successfully imported into HubSpot.
⭐ Best Practices ⭐
To maintain clean and accurate data within HubSpot:
-
Remove Duplicates - Review your file for duplicate records before uploading.
-
Format Names Properly - Ensure first and last names are properly capitalized.
-
Example:
- Correct: John Smith
- Incorrect: JOHN SMITH
-
- Email Addresses - Email addresses can remain in lowercase.
-
Match HubSpot Property Names - To streamline the mapping process, name your file columns exactly as they appear in HubSpot property names whenever possible. This reduces manual mapping and minimizes the risk of import errors.